查看现可下载分发版列表.(最好开代理)
1
2
3
4
5
6
7
8
9
10
11
12
13
14
15
16
17
18
19
~ wsl -l -o 'wsl.exe --install <Distr>' 安装。-linux Kali Linux Rolling-18 .04 Ubuntu 18.04 LTS-20 .04 Ubuntu 20.04 LTS-22 .04 Ubuntu 22.04 LTS-24 .04 Ubuntu 24.04 LTS7.9 8.7 9.1 USE-Leap -15 .6 openSUSE Leap 15.6 USE-Linux -Enterprise-15-SP5 SUSE Linux Enterprise 15 SP5USE-Linux -Enterprise-15-SP6 SUSE Linux Enterprise 15 SP6USE-Tumbleweed openSUSE Tumbleweed
wsl --install <distr-name> 将会 -> dir : C:\Users\<username>\AppData\Local\Packages\<ditr-name>,wsl 的虚拟存储文件位于 dir/LocalState.
移动该ext4.vhdx :
1 wsl --manage <distr-name > --move </path/dir >
实际也更改了ext4.vhdx 的位置.
1
2
3
4
~ wsl -l -v -18 .04 Running 2 2
目前好像只能通过导出再导入 (真麻烦 )-: 😓
1
2
wsl --export <distr-name > </path/backup.tar>--import <new-distr -name > </path/to-vhdx-dir > </path/backup.tar>
1
2
# 启动时 cd 到 home
图标:https://assets.ubuntu.com/v1/49a1a858-favicon-32x32.png
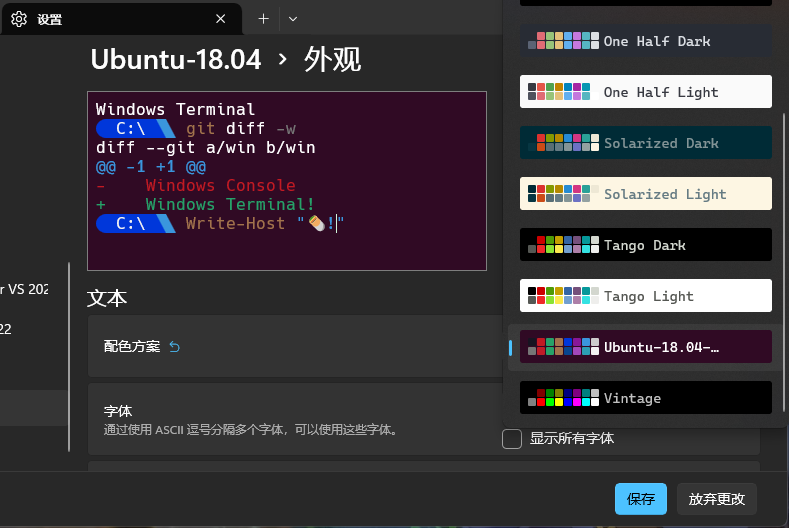
Ubuntu终端经典外观配色
wsl 默认网络模式为 NAT,不能直接使用宿主机的 localhost 代理,多个distrobution共享同一个网络栈(意味着有相同的ip 😓 )-:
什么是 NAT: 通过对 IP 数据包中源 IP / 端口,目的 IP / 端口修改,使得在同一个私有子网中的主机通过一个共有 IP 对外访问的网络技术。
几种 NAT 类型
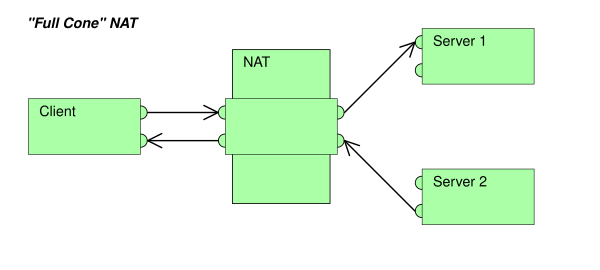
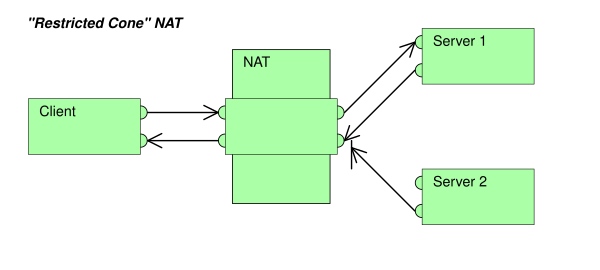
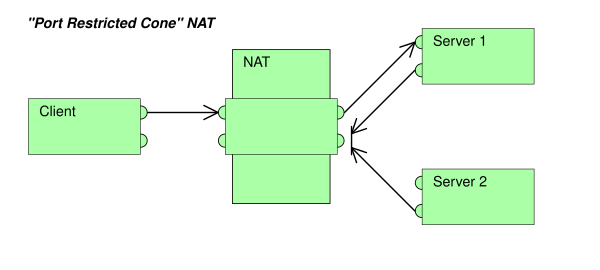
前三种:映射 IP / port 与 目的 IP / port 无关,前者固定。
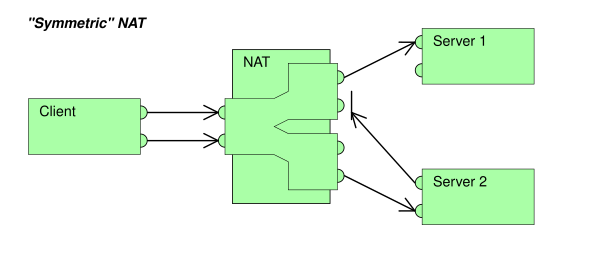
对称NAT:对于每一个不同的 目的 IP / port 其 映射 IP / port 都不同,动态 生成。
Name
示例图
完全圆锥型NAT(Full cone NAT,也叫NAT1)
受限圆锥型NAT(Restricted cone NAT,也叫NAT2)
端口受限圆锥型NAT(Port-Restricted cone NAT,也叫NAT3) 类似受限制锥形NAT,但是还有端口限制。
对称NAT(Symmetric NAT,也叫NAT4)
额。。没得解决,至少不能通过现有的配置项解决,所有的 wsl distr 都是共享一个 wsl vm ,本质上处于同一 network namespace,也有一些 “奇淫技巧”可以实现不同ip,但都有一些这样那样的限制,不够通用 --_–
最好关闭wsl的防火墙
~/.wslconfig
两种方式:
通过局域网形式手动设置到宿主机的代理.
使用 mirror网络模式. (该种方式下宿主机通过 localhost:port 访问 docker 容器 会有些问题,通过 LAN IP 访问是没问题的。)
开启代理软件的局域网访问。
固定宿主机 wsl 虚拟网卡的 ip (电脑重启后会失效 😓)
1 2 3 4 set address name="<wsl-vEthernet-name>" static <host-ip > <mask>
固定 wsl 实例 ip (方便后面访问 wsl 内服务)
1 sudo vim /etc/netplan/01-netcfg.yaml
1 2 3 4 5 6 7 8 9 10 11 12 network: version: 2 ethernets: eth0: dhcp4: no addresses: - <ip>/N gateway4: <host-ip> nameservers: addresses: - 8.8 .8 .8 - 8.8 .4 .4
应用
为 apt,curl,docker,git 设置代理
使用 zsh 的配置文件中自定义的 环境变量导出脚本代理 apt curl
1 2 3 4 5 6 7 8 9 10 11 12 13 14 15 16 17 18 19 20 21 proxy export ALL_PROXY="http://${host_proxy} " export HTTP_PROXY="http://${host_proxy} " export HTTPS_PROXY="http://${host_proxy} " export NO_PROXY=localhost,127.0.0.1"http://${host_proxy} " "http://${host_proxy} " echo -e "Acquire::http::Proxy \"http://${host_proxy} \";\nAcquire::https::Proxy \"http://${host_proxy} \";" | sudo tee /etc/apt/apt.conf.d/apt-proxy.conf > /dev/nullunproxy unset ALL_PROXYunset HTTP_PROXYunset HTTPS_PROXYunset http.proxyunset https.proxyecho -e "" | sudo tee /etc/apt/apt.conf.d/apt-proxy.conf > /dev/null
为 docker 设置代理
For docker daemon (to access images stored on Docker Hub and other registries, and to reach other nodes in a Docker swarm):
1 sudo vim /etc/docker/daemon.json
1
2
3
4
5
6
7
{
1 sudo systemctl restart docker
For builds and containers
1 vim ~/.docker/config.json
1
2
3
4
5
6
7
8
9
{
For docker building image,only avaliable during building the image
1 docker build --build-arg HTTP_PROXY="<host-proxy>" .
安装 zsh
1 sudo apt update && apt install zsh
安装 oh-my-zsh
1 sh -c "$(curl -fsSL https://raw.githubusercontent.com/ohmyzsh/ohmyzsh/master/tools/install.sh) "
安装插件
1
2
git clone https://github.com/zsh-users/zsh-autosuggestions ${ZSH_CUSTOM:-~/.oh-my-zsh/custom} /plugins/zsh-autosuggestionsclone https://github.com/zsh-users/zsh-syntax-highlighting.git ${ZSH_CUSTOM:-~/.oh-my-zsh/custom} /plugins/zsh-syntax-highlighting
1 plugins=(git zsh-autosuggestions zsh-syntax-highlighting history-substring-search)
参考:
